
Looking for how to add users to a shared shop, manage shop permissions, or remove shop users in your Stadium workspace? This step-by-step guide covers everything you need to know about shared shop user management, including adding admins, assigning roles, updating access levels, and removing users from your shop.
This article includes sections
⚠️ Important Things to Know Before Adding Shop Users
- Workspace owners and admins with custom permissions to manage shops are automatically added to all shops created within the Workspace.
- Workspace Admins with default permissions are assigned Limited Shop Access by default, but Shop Owners can upgrade them to Full Access.
- Users with a Sender role in the Workspace can only have Limited Shop Access.
- Users with Full Shop Access can:
- Modify shop settings
- Request changes
- View all shop orders (including orders created by others)
- Users with Limited Access can only place orders and cannot view or manage other users’ orders or edit the shop.
✨ Shared Shops Requirements:
The Shared Shops feature is included in the Enterprise package. You can explore this feature with a 30-day free trial by creating a company Workspace.
Follow the steps in this article: 👉 How to Create a Company Workspace
To continue using the shared shops feature after the trial:
- Ensure the Enterprise package is purchased and activated
- Visit the 💰Pricing Page to view available packages and book a call with our team
Here's how to add and remove users to your existing shop:
🔐Access Your Shop Settings
Log in to Your Account
- Open your web browser and go to bystadium.com
- Log in using your credentials.
- Once logged in, you will automatically land in your default Company Workspace.
- If needed, you can change your default Workspace anytime from your Account Settings.
For Users With Multiple Workspaces:
Click the drop-down arrow next to your profile name in the top navigation bar.
Select the Workspace where your shop is created.
Navigate to the Shops Page
-
Expand the Sidebar Menu (if collapsed)
- Click on the left-facing arrow ( ˂ ) at the top-left corner of the sidebar to expand the navigation menu.
(If the menu is already expanded, you can skip this step.)
- Click on the left-facing arrow ( ˂ ) at the top-left corner of the sidebar to expand the navigation menu.
-
Navigate to Shops
- In the sidebar menu, locate and click on "Shops" to access your shop's page.
Select Your Live Shop
- On the " Shops" page, navigate to LIVE Shops, then click on the shop you'd like to access.
Filter Shops by Owner (For Company Workspace Users)
If you have permission to access and manage shared shops, you can use the OWNED BY filter to view shops created by other users in your company Workspace.
Click the drop-down arrow next to Owned By to open the filter options.
In the search field, type the name of the user whose shops you want to view.
Select the checkbox next to the user’s name. You can select multiple users at the same time if needed.
Once selected, the system will automatically display the shops created by the selected user(s)
The applied filters will appear under Applied Filters on the page.
Navigate to Shop Users
- Within your shop's dashboard, find the "SETTINGS" tab, and click on it.
- Select "SHARED SHOP USERS" and click "ADD USERS."
👥 Adding Shop Users
- If you do not have existing contacts, you will be prompted to add admin details via email or a CSV sheet.
➕ Option 1: Add Users' Email
- You can add the emails manually by clicking on INPUT EMAILS
- Choose MANUALLY.
- Enter the email addresses of the recipients.
- Choose a Workspace role.
- Click on ADD CONTACTS.
📂 Option 2: Add Users via CSV Upload
- You can add them all at once by uploading a CSV file.
- To get started, click on "ADD CSV".
- Click Download Template to fill out the CSV sheet.
Fill out the CSV file
-
Fill all columns in the CSV file with user details.
Assign roles under Column Z (ensure to choose "Admin" or "Sender" role only).
Upload CSV File
- Return to the Contacts page and click SEARCH LOCAL DEVICE to upload.
(Optional) Check the box for Let CSV contacts overwrite existing contacts (excluding contacts synced via HRIS) if you want updates to replace current records.
- If roles were not specified on the CSV sheet, click the drop-down arrow next to Sender role and assign a designated role for the new users.
🔄 Optional: Import Users via HRIS/ATS Integration
-
Please note that this is only available for the Engagement Suite and Business package (previously known as Team, or Enterprise accounts).
- You can also integrate your HRIS/ATS system to import recipients seamlessly.
- * To set up an integration with your employee database, click the "Manage Contacts" button to configure the integration. You can refer to the article below on how to set it up.
- ⚙️How to set up an integration
🔗Adding Users from Existing Contacts
- If you already have existing contacts in your account or have successfully added the new users, select the CHECK BOX of the user and click "SHARE SHOP WITH USERS" to save the changes.
✅Confirmation
- Once the new admin is added, you will see them on the Shop's Admin dashboard.
🔐Managing Shop User Access
🟡 Limited Access (Default)
- By default, all newly added users are given "Limited" shop access only.
- Users with "Limited" shop access can only send gift orders using your shop but they are not able to see orders created by other users or edit the shop.
🟢 Grant Full Shop Access
- If the user is already a Workspace admin with default permission, you can directly switch their shop access to "Full" access.
- Users with "Full" shop access will have management permission similar to the Shop Owner and will be able to see orders created by other users in the shop.
- A confirmation message will appear once the change is applied.
🔄 Update Workspace Role (If Needed)
- If the user is not a Workspace admin, you must first change their role permission from the contacts page.
- Click on the Manage Permissions link to make the changes. For a complete guide, follow the steps in this article: 👉 Managing Permissions
- Once done, you can go back to the shop settings and change their shop access.
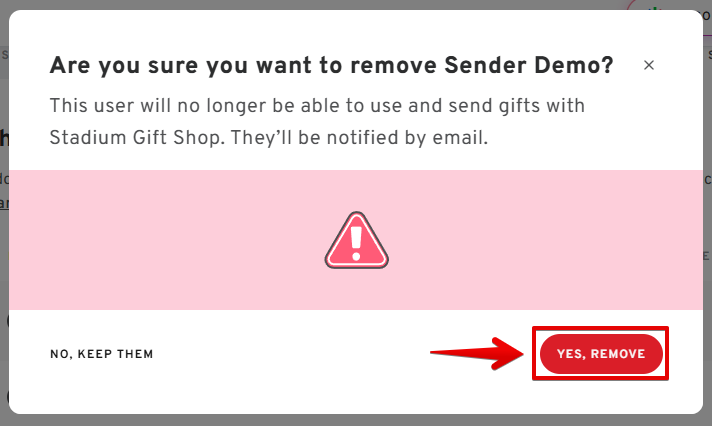
❌ Removing Shop Users
🗑️ Steps to Remove a Shop User
- Go back to your Shop Dashboard, then click SETTINGS, then click on SHOP USERS.
- To remove a user, click on the trash can icon next to their name, then on the pop-up window, confirm the removal by clicking YES REMOVE.
Note: You cannot remove a user if they still have an active order in their account for the selected shop.
✅Confirmation
- Once done a confirmation message will appear on the top right of your screen.
Try premium features free for 30 days! After your trial, upgrade to a paid Stadium Package to continue enjoying premium access.
Visit our Pricing Page to explore the details of each Package and choose the one that best suits your needs.
Any question(s)? We're here to help!
Ask us anything via CHAT / FILL OUT OUR CONTACT US FORM:
.
This article includes sections
⚠️Important Things To Note When Adding Admins
- Workspace Owners and Admins with a Custom Permission to manage shops in the Workspace will be automatically added to any shops created by other users in the Workspace.
- Admins with Default Permission in the Workspace with have "Limited" Shop Access by default but can be modified by the shop owner to "Full" Shop Access. Once given "Full" Shop Access they will have the ability to request modifications in the shop, modify shop settings, and access all orders in the shop, regardless of their role in the company Workspace.
- Users with a Sender Role in the Workspace can only have "Limited" Shop Access, even when added as a shop user.
- Orders created by other users in the shop will be visible to both Workspace Owners and admins with "Full" Shop access.
✨ Shared Shops Requirements:
The Shared Shops feature is included in the Enterprise package. You can explore this feature with a 30-day free trial by creating a company Workspace.
Follow the steps in this article: 👉 How to Create a Company Workspace
To continue using the shared shops feature after the trial:
- Ensure the Enterprise package is purchased and activated
- Visit the 💰Pricing Page to view available packages and book a call with our team
Here's how to add and remove admins to your existing shop:
Access Your Shop Settings
Log in to Your Account
- Open your web browser and go to bystadium.com
- Log in using your credentials.
- Once logged in, you will automatically land in your default Company Workspace.
- If needed, you can change your default Workspace anytime from your Account Settings.
For Users With Multiple Workspaces:
Click the drop-down arrow next to your profile name in the top navigation bar.
Select the Workspace where your shop is created.
Navigate to the Shops Page
-
Expand the Sidebar Menu (if collapsed)
- Click on the left-facing arrow ( ˂ ) at the top-left corner of the sidebar to expand the navigation menu.
(If the menu is already expanded, you can skip this step.)
- Click on the left-facing arrow ( ˂ ) at the top-left corner of the sidebar to expand the navigation menu.
-
Navigate to Shops
- In the sidebar menu, locate and click on "Shops" to access your shop's page.
Select Your Live Shop
- On the " Shops" page, navigate to LIVE Shops, then click on the shop you'd like to access.
Filter Shops by Owner (For Company Workspace Users)
If you have permission to access and manage shared shops, you can use the OWNED BY filter to view shops created by other users in your company Workspace.
Click the drop-down arrow next to Owned By to open the filter options.
In the search field, type the name of the user whose shops you want to view.
Select the checkbox next to the user’s name. You can select multiple users at the same time if needed.
Once selected, the system will automatically display the shops created by the selected user(s)
The applied filters will appear under Applied Filters on the page.
Go to Shop Settings
Find Shop USERS
- Within your shop's dashboard, find the "SETTINGS" tab, and click on it.
- Select "SHARED SHOP USERS" and click "ADD USERS."
Adding Shop Users
If you do not have existing contacts, you will be prompted to add admin details via email or a CSV sheet.
Adding Users Using Emails
- You can add the emails manually by clicking on INPUT EMAILS
- Choose MANUALLY.
- Enter the email addresses of the recipients.
- Choose a Workspace role.
- Click on ADD CONTACTS.
Adding Users Using a CSV Sheet
- You can add them all at once by uploading a CSV file.
- To get started, click on "ADD CSV".
- Click Download Template to fill out the CSV sheet.
Fill out the CSV file
-
Fill all columns in the CSV file with user details.
Assign roles under Column Z (ensure to choose "Admin" or "Sender" role only).
Upload CSV File
- Return to the Contacts page and click SEARCH LOCAL DEVICE to upload.
(Optional) Check the box for Let CSV contacts overwrite existing contacts (excluding contacts synced via HRIS) if you want updates to replace current records.
- If roles were not specified on the CSV sheet, click the drop-down arrow next to Sender role and assign a designated role for the new users.
Integrate your HRIS/ATS system
-
Please note that this is only available for the Engagement Suite and Business package (previously known as Team, or Enterprise accounts).
- You can also integrate your HRIS/ATS system to import recipients seamlessly.
- * To set up an integration with your employee database, click the "Manage Contacts" button to configure the integration. You can refer to the article below on how to set it up.
- How to set up an integration
Adding Users from Existing Contacts
- If you already have existing contacts in your account, select the CHECK BOX of the user and click "SHARE SHOP WITH USERS" to save the changes.
Confirmation
- Once the new admin is added, you will see them on the Shop's Admin dashboard.
Managing Shop User Access
- By default, all newly added users are given "Limited" shop access only.
- Users with "Limited" shop access can only send gift orders using your shop but they are not able to see orders created by other users or edit the shop.
Giving Full Shop Access
- If the user is already a Workspace admin with default permission, you can directly switch their shop access to "Full" access.
- Users with "Full" shop access will have management permission similar to the Shop Owner and will be able to see orders created by other users in the shop.
- A confirmation message will appear once the change is applied.
Changing Workspace Role Permission
- If the user is not a Workspace admin, you must first change their role permission from the contacts page.
- Click on the Manage Permissions link to make the changes. For a complete guide, follow the steps in this article: 👉 Managing Permissions
- Once done, you can go back to the shop settings and change their shop access.
Removing Shop Users
- Go back to your Shop Dashboard, then click SETTINGS, then click on SHOP USERS.
- To remove a user, click on the trash can icon next to their name, then on the pop-up window, confirm the removal by clicking YES REMOVE.
Note: You cannot remove an admin if they still have an active order in their account for the selected shop.
- Once done a confirmation message will appear on the top right of your screen.
Try premium features free for 30 days! After your trial, upgrade to a paid Stadium Package to continue enjoying premium access.
Visit our Pricing Page to explore the details of each Package and choose the one that best suits your needs.
Any question(s)? We're here to help!
Ask us anything via CHAT / FILL OUT OUR CONTACT US FORM:
.
Comments
0 comments
Please sign in to leave a comment.