
Looking for a central way to manage your logos, banners, brand guidelines, and other design assets across your Workspace on Stadium? The Asset Library helps you store, organize, and reuse your brand assets from one central location. Instead of uploading the same files repeatedly, you can access approved assets within your Workspace whenever you create shops, customize swag, request mockups, create automated swag collections, and more.
Whether you're managing one brand or multiple campaigns, the Asset Library helps your team stay organized, maintain brand consistency, and save time by keeping important assets readily available across your Workspace.
This article includes:
- 📁 What Is the Asset Library?
- 🌟 Why Should I Use the Asset Library?
- 🖼️ What Types of Assets Can I Store?
- 🔄 Where Can I Use My Saved Assets?
- 👥 Who Can Access the Asset Library?
- 🔒 What Happens If the Person Who Uploaded an Asset Leaves the Workspace?
- 💡 Why Is This Better Than Uploading Files Every Time?
- 🚧 How Do I Use the Asset Library
- ✨Using Assets from Your Asset Library
🤔 What is the Asset Library?
The Asset Library is a shared repository for your Workspace that stores commonly used branding assets in one place.
Depending on your permissions, you can:
- Upload and organize brand assets
- Reuse assets across multiple Stadium features
- Edit asset names and notes
- Download or delete assets
- Search and filter assets for faster access
Instead of uploading the same file multiple times, your team can simply select an existing asset whenever it's needed.
🌟 Why Should I Use the Asset Library?
The Asset Library helps eliminate repetitive work while ensuring your team always uses the correct branding materials.
Some of the biggest benefits include:
🎨 Keep Your Brand Consistent
Everyone on your team can access the same approved logos, banners, and brand guidelines, reducing the chance of outdated or incorrect branding being used.
🤝 Improve Team Collaboration
Assets belong to the Workspace instead of an individual user. This means your team can continue using shared assets even if the original uploader leaves the organization.
📂 Stay Organized
Search and filter assets by name, asset type, or the person who uploaded them to quickly find what you need.
🚀 Work Faster Across Stadium
The Asset Library is integrated into multiple workflows, allowing you to select existing assets instead of uploading files again.
🖼️ What Types of Assets Can I Store?
The Asset Library currently supports:
- Artwork and Logos
- Banners
- Brand Guidelines
Additional asset types may be introduced in future updates.
🔄 Where Can I Use My Saved Assets?
Once stored in the Asset Library, compatible assets can be reused across supported Stadium features, including:
- Shop creation and customization
- Request Mockups
- Bulk Swag orders
- Automated Swag Collections
- Workspace branding
Only compatible asset types will appear during each upload flow.
👥 Who Can Access the Asset Library?
Access Workspace asset library depends on your Workspace permissions and role.
Generally:
- Owners have full access to manage the Asset Library and can grant permission to Admins.
- Admins can use, configure Asset Library permissions, and manage the Asset Library
- Senders can use assets stored in the library.
- Members do not have access to the Asset Library or upload features.
Owners can configure the permissions for the admins from the Contacts page.
By default, only the owner will have access granted to manage the asset library.
🔒 What Happens If the Person Who Uploaded an Asset Leaves the Workspace?
Nothing changes.
Assets are shared at the Workspace level rather than being tied to a single user. If the original uploader is deactivated or removed, the assets remain available for authorized users to continue using and managing.
This ensures important branding assets stay accessible to your organization.
💡 Why Is This Better Than Uploading Files Every Time?
Without an Asset Library, teams often:
- Upload duplicate copies of the same logo.
- Use outdated branding.
- Spend time searching for files.
- Depend on a single employee to locate brand assets.
The Asset Library solves these challenges by giving your Workspace one trusted source for approved branding assets, making every future upload faster and more consistent.
🚧 How Do I Use the Asset Library?
Follow the steps below to upload, manage, and reuse assets in your Asset Library.
➕ Adding Assets to Your Asset Library
Navigate to Your Asset Library
-
Expand the Sidebar Menu (if collapsed)
- Click on the left-facing arrow ( ˂ ) at the top-left corner of the sidebar to expand the navigation menu.
(If the menu is already expanded, you can skip this step.)
- Click on the left-facing arrow ( ˂ ) at the top-left corner of the sidebar to expand the navigation menu.
-
Navigate to Swag
- In the sidebar menu, locate and click on "Asset Library" to access your asset library page.
Choose an Asset Type
There are two ways to add assets to your library.
Option 1: First time Users
- The first time you visit the Asset Library, you'll see shortcut cards for the available asset types:
- Artwork & Logos
- Shop Banners
- Brand Guidelines
- Click the + icon on the asset type you want to upload.
- If you'd like to hide a shortcut card, click the − icon.
Option 2: Add New Asset
- Click the ADD NEW ASSET button to upload a new asset at any time.
Enter Asset Details
- A pop-up window will appear.
- Enter the following information:
- Asset Name
- Asset Type
- Once you've entered the required information, click NEXT.
📤 Uploading Different Types of Assets
🎨 UPLOAD ARTWORK/LOGO
- Select Artwork/Logo as the asset type.
- Click NEXT.
- Upload a logo from your device or select one from your previous uploads (if available).
- Review the upload requirements and select I understand and accept the conditions.
- (Optional but Recommended) Add notes for Stadium designers explaining how your logo should be used.
Example notes may include:
- Recommended logo size
- Best placement
- Preferred design colors for each product:
- Use the one-color version for embroidery
- Other instructions such as "Leave clear space around the logo for the best appearance"
- Click SAVE to finish uploading.
⚠️ Important:
For the best print quality:
- Upload logos with a transparent background whenever possible.
- Use artwork with a minimum resolution of 300 DPI.
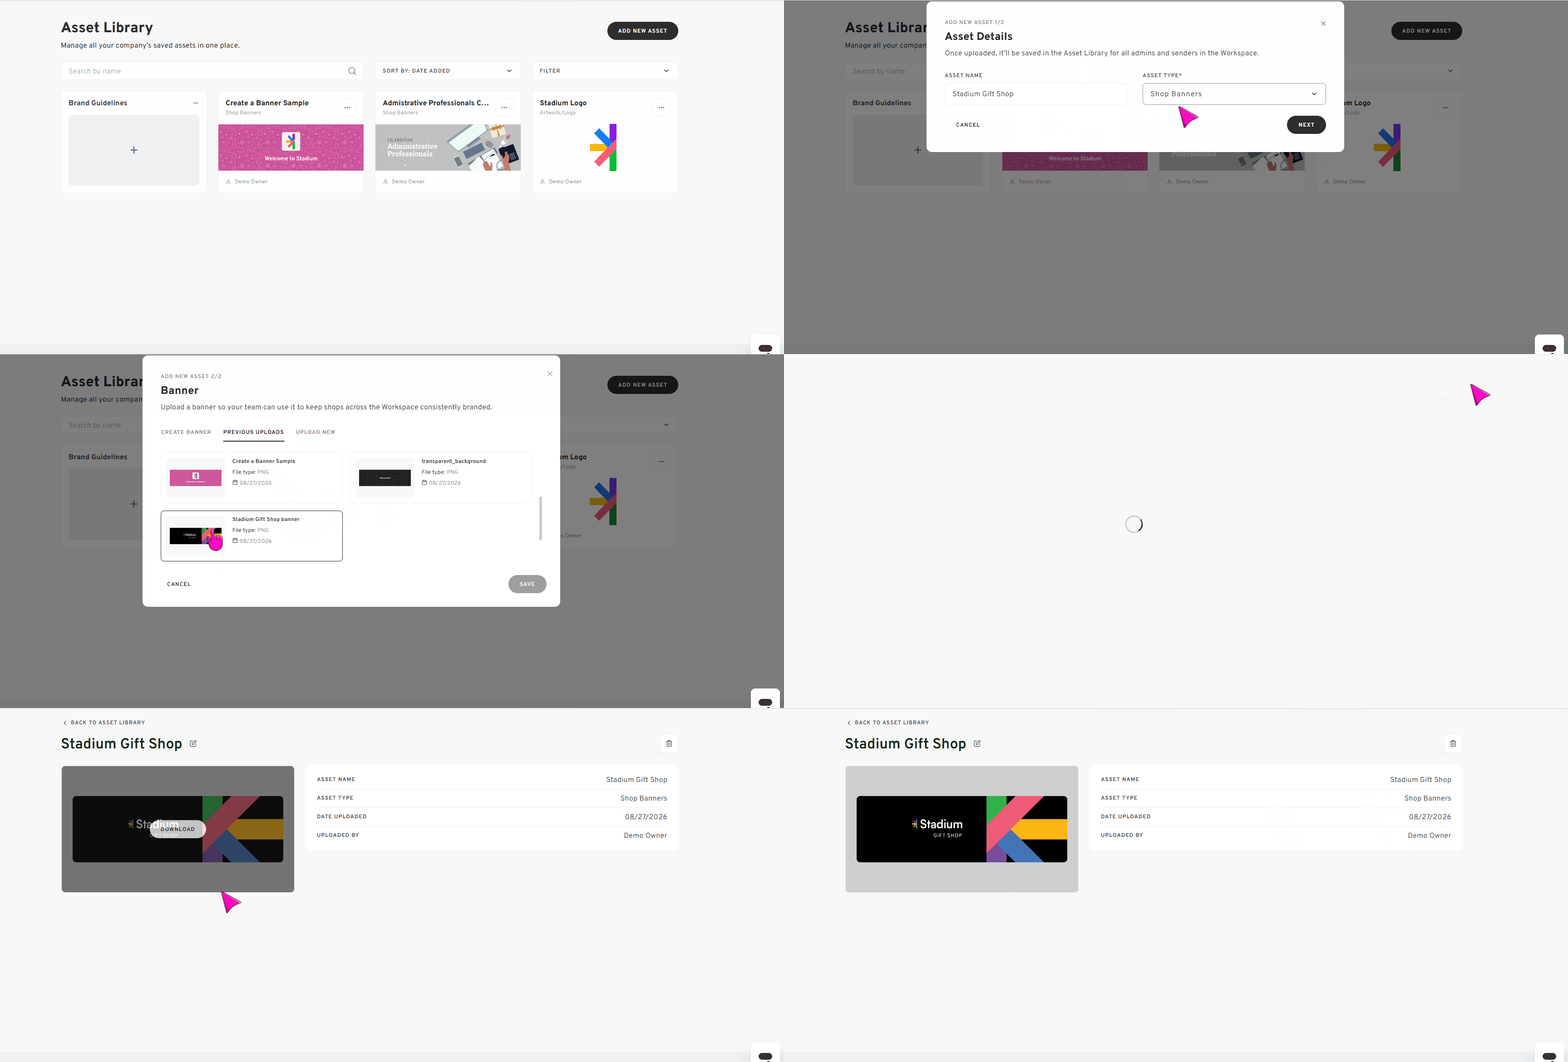
🖼️ UPLOAD SHOP BANNERS
Select Shop Banner, then click Next.
You can upload a banner in three different ways.
Option 1: UPLOAD A NEW BANNER
- Click SEARCH LOCAL DEVICE.
- Select your banner.
- Click SAVE.
⚠️ Banner Requirements
- Accepted file types: PNG, JPEG, JPG
- Recommended size: 2880 × 910 pixels
- Maximum file size: 10 MB
Option 2: CREATE A BANNER
Create a custom banner directly in Stadium.
You can:
- Upload a new logo
- Select a logo from Previous Uploads
- Select a logo from the Asset Library
- Add custom text
- Change banner colors
- Resize design elements
After finalizing your design:
- Select I understand and accept the conditions. (if a logo was uploaded)
- Click SAVE.
Option 3: PREVIOUS UPLOADS
- If you selected the "PREVIOUS UPLOADS" option, simply select the banner from the given options.
- Once done, click on SAVE to finalize the upload.
📄UPLOAD BRANDED GUIDELINES
- If you selected Brand Guidelines, click BROWSE FILES.
- Select your document.
- Click SAVE.
⚠️ Brand Guideline Requirements
- Accepted file types: PDF, JPG, PNG, DOCX
- Maximum file size: 50 MB
🛠️ Managing Your Assets
Once assets have been uploaded, you can easily organize and manage them.
🔍 Search for an Asset
- Use the search bar to quickly find an asset by its name.
↕️ Sort Assets
- Click the Sort By menu to organize assets by:
- Date added
- Name A-Z
- Name Z-A
🏷️ Filter Assets
- Click the FILTER drop-down to narrow your results.
- You can filter assets by:
- Added By
- Asset Type
- After selecting your filters, click APPLY FILTER.
✏️ Edit an Asset Name
- To edit the name of your asset, click on the asset.
- On the asset's details page, click the pencil icon next to its name.
-
Enter the new name and click the SAVE button to apply the changes.
⬇️ Download an Asset
There are two ways to download an asset.
Option 1
- Click the three-dot menu on an asset card.
- Select Download.
Option 2
- Open the asset details page by clicking on the asset.
- Hover over the asset preview.
- Click DOWNLOAD.
🗑️ Delete an Asset
There are two ways to delete an asset.
Option 1
- Click the three-dot menu on the asset.
- Select Delete.
Option 2
- Open the asset details page.
- Click the Trash icon.
Finally, click Yes, Delete to confirm.
⚠️ Important
Deleting an asset removes it from future use throughout the Workspace.
Existing shops, swag, and designs that already use the asset will remain unchanged.
✨ Using Assets from Your Asset Library
After assets have been added to your Asset Library, they'll be available across supported Stadium features whenever you're uploading:
- Artwork or Logos
- Shop Banners
- Brand Guidelines
Simply select the ASSET LIBRARY tab during the upload process and choose the asset you'd like to use instead of uploading it again.
This helps maintain consistent branding while saving time across your Workspace.
Try premium features free for 30 days! After your trial, upgrade to a paid Stadium Pass to continue enjoying premium access.
Visit our Pricing Page to explore the details of each Stadium Pass and choose the one that best suits your needs.
Any questions? We're here to help!
Ask us anything via CHAT / FILL OUT OUR CONTACT US FORM:
Comments
0 comments
Please sign in to leave a comment.